Super Anleitung. Ordentliche Auflösung. Das ganze noch in Deutsch wäre zu schön. Alle Datenblätter sind sauber Kopiert und alle Leitungswege sind sauber ausgeführt
Thanks God for the internet and thanks for the service like this - proffessional solution on time.
Text excerpt from page 218 (click to view)
FUSING
15 January 1992
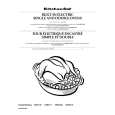
7.5 FUSING LAMP REPLACEMENT
[E] [D] [B] [C] [H]
[F]
[A] [G] 1. Make sure that the main switch is turned off and the power supply cord is unplugged. 2. Open the front cover and remove the upper inner cover (3 screws). 3. Remove the cleaning unit. (See Cleaning Unit Removal.) 4. Open the upper unit by pushing release lever. 5. Remove the lower inner cover (5 screws). 6. Remove the fusing cover [A] (1 screw). 7. Remove the thermoswitch bracket [B] (1 screw). 8. Disconnect the connector [C] of the fusing lamp from the thermoswitch. 9. Remove the upper rear cover (2 screws) and lower rear cover (2 screws). 10. Remove the ac drive board cover (2 screws). 11. Remove the ac drive board bracket [D] with the ac drive board [E] (2 screws and all ac harness connectors). 12. Remove the rear support bracket [F] (1 screw). 13. Pull the fusing lamp [G] out the front end of the hot roller. NOTE: a) Do not touch the fusing lamp with bare hands. b) Slide the new fusing lamp into the hot roller through the opening at the front of the roller. c) Make sure that the fusing lamp insulators [H] (front and rear) are properly set in the holders as shown.